Cooling down well in summer is essential to withstand the sweltering heat. However, many homes do not have a pool or are too far from the beach. But if your house has a garden or patio, the solution is to take a good soak and alleviate the hot flash.
In this article, we explain how to install a garden shower. It is simple, practical, inexpensive, and will help you live a more refreshing summer. It would help if you bought an outdoor shower.
Step One
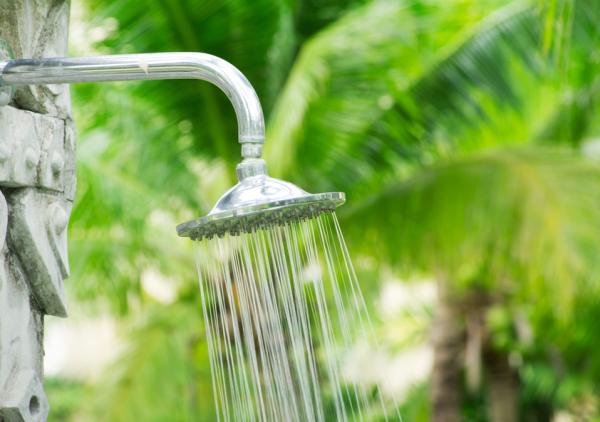
Choose the garden shower model. In a DIY or decoration store, even in some supermarkets, you will find several outdoor showers. There are different types: some with feet, others for the wall ... Select the most suitable style for your garden and terrace and carry out this simple installation. In the following steps, we explain a shower in the garden hooked to the wall using poles.
Read also: Tips for Cleaning a Swimming Pool.
Step Two
Take water. First, you must find the location for the shower in the garden. This should be placed near the hose, as it will be the place where we will screw the shower to access the water intake. To prevent leaks between the hose and the shower, put a sealing gasket.
Once you have placed the joint - a round piece that you will find in any hardware store - you must join the two masts. That of the hose with that of the shower so that the water passage occurs when the hose tap is opened.
Step Four
Place the shower. These outdoor showers usually have a long pole that must be driven into the ground. You can place it in a pot, or if you already have a lawn garden, you can nail it into the ground. We recommend that you place a wooden, plastic, or artificial grass grid on the floor to avoid slipping while you cool off in your shower.
Step Five
Once the shower is in place, you can fix it on the wall so that it is more supported and does not fall, for example, in case of high wind. For this, you will only need some supports. Measure the thickness of the tube to find out what gauge the brackets should be. Thus, you can buy the most suitable parts for your hardware store.
Mark a vertical line on the wall where the shower will be attached. Then, with the help of a drill, make two holes to nail the brackets to the wall. We recommend that the drill is in hammer mode.
Step Seven
Next, use a hammer to drive the dowels that will nail the shower and screw the brackets into the wall. To screw, we advise you to use the drill. You will go faster. But in this case, don't use it in percussion mode.
Step Eight
Also read: Saving Water When Watering Plants-The Best Tips
Fit the shower tightly onto the supports and the floor and connect the hose fitting. When you have it, check that the shower works correctly and that the installation has been a success.
Step Nine
With this simple installation and this practical garden shower, when the summer is over, you can comfortably store the shower and leave the wall ready until next season. Thus, you will keep the device for longer and in perfect condition. Cool off!
Adapted and translated by The Cop Cart Staff
Sources: Uncomo
")


